Your Tiny Tots (ages 2-5) can learn the parts and life cycle of a flowering plant and what plants need to survive. They’ll learn the importance of flowers in nature and observe live flowers and their colors.
You will need:
- paper and crayons/markers/colored pencils
- color squares (pieces of paper, paint chips, or anything else to inspire a color hike – crayons, etc.)
- flower craft: one or more white coffee filters (or could use white tissue paper cut into a circle), washable markers, spray bottle of water, paper towels, pipe cleaner
Draw a picture of a flower along with Miss Erin! Make sure to include the stem, leaves, petals, and the inside of the flower where the nectar and pollen is!
Does your child know what the center of the flower eventually turns into? After a pollinator visits, the inside of the flower turns into seeds!
Do they know what part of the flower hides under the ground? The roots!
Sing along with Miss Erin as we sing a flower version of “Head, shoulders, knees and toes”! Have your child hold their open hands on both sides of their face for “flower”, point to their body for “stem”, hold out their arms for “leaves”, and touch their toes for “roots”. Have them make their arms into a circle for “sun” and use their fingers to rain down for “showers”. Crouch down and then mimic sprouting into a flower for “and the seed grows into a flower”.
Lyrics, to the tune of “Head, shoulders, knees and toes”:
Flower, stem, leaves and roots, leaves and roots.
Flower, stem, leaves and roots, leaves and roots.
All it takes is sun and showers,
And the seed grows into a flower! [Repeat, faster!]
Go on a color hike! If it’s safe to do so, go outside to find some flowers. Use color cards, paint chips, crayons, or anything else to inspire what colors you’ll try to find in nature! How many colors can you find?
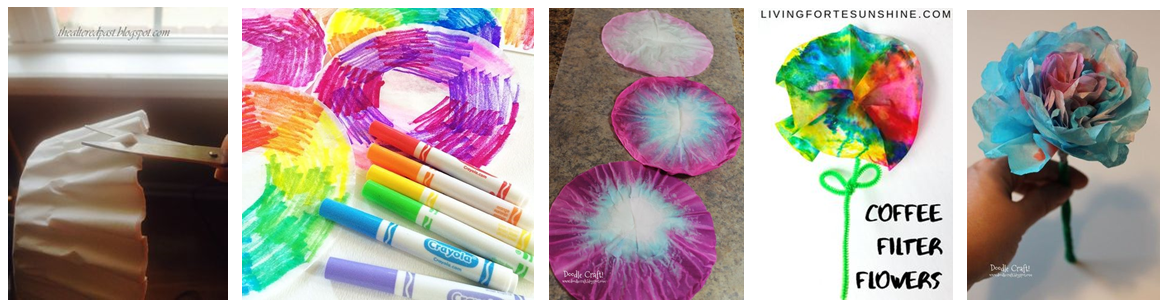
Assemble your materials for the craft: You’ll need one or more white coffee filters – the cone kind are fine, but the circular flat-bottomed kind are better. You’ll also need washable markers, a spray bottle with water, and paper towels or something else to put down on the work surface to prevent a mess (the marker will bleed through the coffee filter). Finally, you’ll need a pipe cleaner to form the center of the flower, but a zip tie would also work.
Let your child use the washable markers to color the inside of the coffee filter, using any colors and patterns they like. They don’t need to fill in all the white spaces, because the colors will run together. When they are finished coloring, spray lightly with water. You will immediately see the marker starting to run! Lay down on paper towels or hang to dry.
Once the filter is completely dry, use the pipe cleaner to stick through the center of the filter, curling the end around your finger in a circle. You may want to add glue to hold the center of the flower in place. You can add multiple filters like ruffled layers to one flower, and you can make the flower extra fancy by using scissors to cut a scalloped edge.
~~
Los niños aprenderán las partes y el ciclo de vida de una planta con flores y lo que las plantas necesitan para sobrevivir. Aprenderán la importancia de las flores en la naturaleza y observarán flores vivas y sus colores.
Materiales:
- ordenador/dispositivo con acceso a Internet
- papel y crayones par dibujar la flor
- cuadros de colores (trozos de papel, virutas de pintura, o cualquier otra cosa para inspirar una caminata de color - crayones, etc.)
- Manualidad de flor: uno o más filtros de café blanco (o podría usar papel de tejido blanco cortado en un círculo), marcadores lavables, botella de agua en aerosol, toallas de papel, limpiador de tuberías (o podría usar una corbata con cremallera)
¡Pregunte a su hijo si pueden dibujar una flor junto con la señorita Erin! ¡Asegúrese de incluir el tallo, las hojas, los pétalos y el interior de la flor donde está el néctar y el polen!
¿Saben en qué se convierte el centro de la flor? Después de que un polinizador visita, el interior de la flor ¡se convierte en semillas!
¿Saben qué parte de la flor se esconde bajo el suelo? ¡Las raíces!
¡Canta junto con la señorita Erin mientras cantamos una versión de flor de "Cabeza, hombros, rodillas y dedos de los pies"! Pida a su hijo que sostenga sus manos abiertas en ambos lados de su cara para "flor", señale su cuerpo para "tallo", sostenga los brazos para "hojas" y toque sus dedos de los dedos de los dedos de los dedos para "raíces". Pídales que hagan sus brazos en un círculo para "sol" y usen sus dedos para llover para "lluvia". Agacharse hacia abajo y luego imite el crecimiento de una flor para " Y entonces la semilla crece y se hace flor".
Letras, al ritmo de "Cabeza, hombros, rodillas y dedos de los ojos":
Flor, tallo, hojas y raíces, hojas y raíces
Flor, tallo, hojas y raíces, hojas y raíces
Todo lo que necesita es sol y un poco de lluvia
Y entonces la semilla crece y se hace flor
[¡Repite más rápido!]
¡Ve en una caminata de color! Si es seguro hacerlo, ve afuera a buscar flores. ¡Usa tarjetas de colores, lápices de colores, crayones o cualquier otra cosa para inspirar qué colores tratarás de encontrar en la naturaleza! ¿Cuántos colores puedes encontrar?
Ensamble sus materiales para la manualidad: Necesitará uno o más filtros de café blanco: el tipo de cono está bien, pero el tipo circular de fondo plano es mejor. También necesitará marcadores lavables, una botella atomizadora con agua y toallas de papel o algo más para colocar en la superficie de trabajo para evitar ensuciarse (el marcador se correrá a través del filtro de café). Por último, necesitarás un cepillo de pipas para formar el centro de la flor, pero una corbata de plástico con cremallera también funcionaría.
Deje que su hijo use los marcadores lavables para colorear el interior del filtro de café, usando los colores y patrones que les gusten. No es necesario rellenar todos los espacios en blanco, porque los colores se mesclarán. Cuando hayan terminado de colorear, rocíe ligeramente con agua. ¡Verás inmediatamente el marcador empezando a correr! Acostarse sobre toallas de papel o colgar para secar.
Una vez que el filtro está completamente seco, utilice el cepillo limpia pipas para atravesar el centro del filtro, y enrede el extremo alrededor de su dedo en un círculo. Es posible que desee agregar pegamento para mantener el centro de la flor en su lugar. Puede agregar varios filtros como capas con volantes a una flor, y puede hacer que la flor sea más elegante usando tijeras para cortar un borde escaldado.